
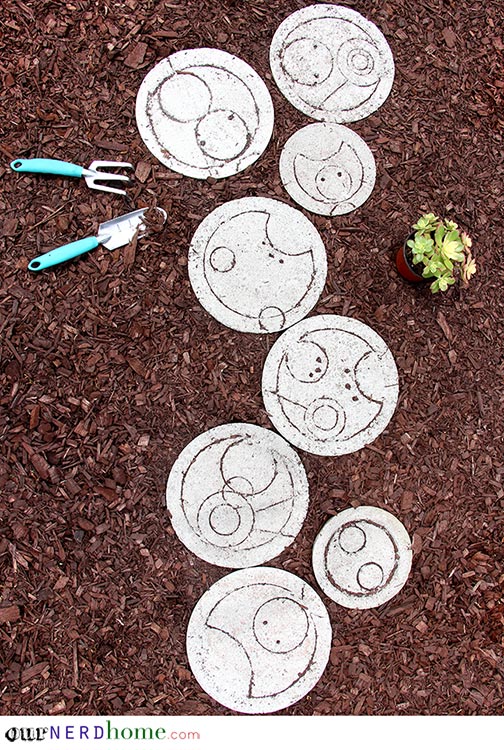
We first teased these DIY Doctor Who stepping stones two months ago (here), but they took a lot more trial and error than we expected! They’re finally done, and we think we’ve figured out the easiest way for you to make them yourselves…
Before we get into this quick tutorial: we missed you guys! We went on vacation to Roatan (Caribbean island awesomeness off the coast of Honduras), where we didn’t really have much internet access. You can see pics on our Instagram, if you’re curious. Basically this sums up our trip:

We <3 our ThinkGeek towel.
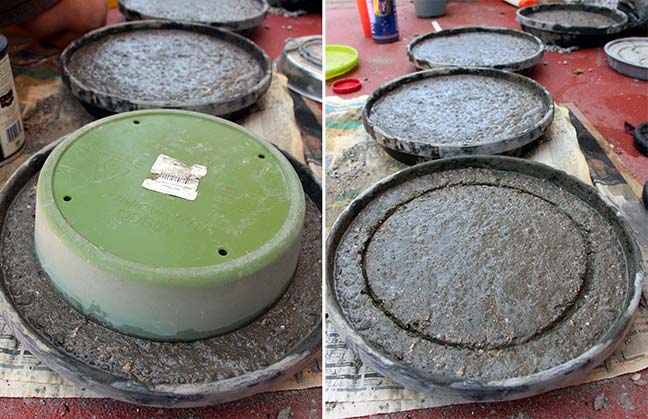
Anyway, let’s talk about Gallifreyan step stones. Because we made some! We tried A LOT of different techniques for this – different kinds of concrete, different ways to make patterns, and in the end we’re going with what is A) easiest, B) cheapest, and C) seems to look best. We initially started with a stepping stone kit. Cute, but not suitable for outdoor use. We moved onto Quikrete, which is cheap at Home Depot/Lowes. It worked, but the stones seemed rocky and the pattern got a little lost. Next we tried Portland cement+sand. Nice and smooth, crisp clean lines… but kind of looked like a kids project. We wanted a more “natural” look. So in the end we went back to Quikrete, worked out a different method, and we’re sticking with that.
What you need: Quikrete, gloves/mask, chicken wire, molds, random round things from around your house (cups, bowls, etc), something straight (we used paint stick), a pencil…
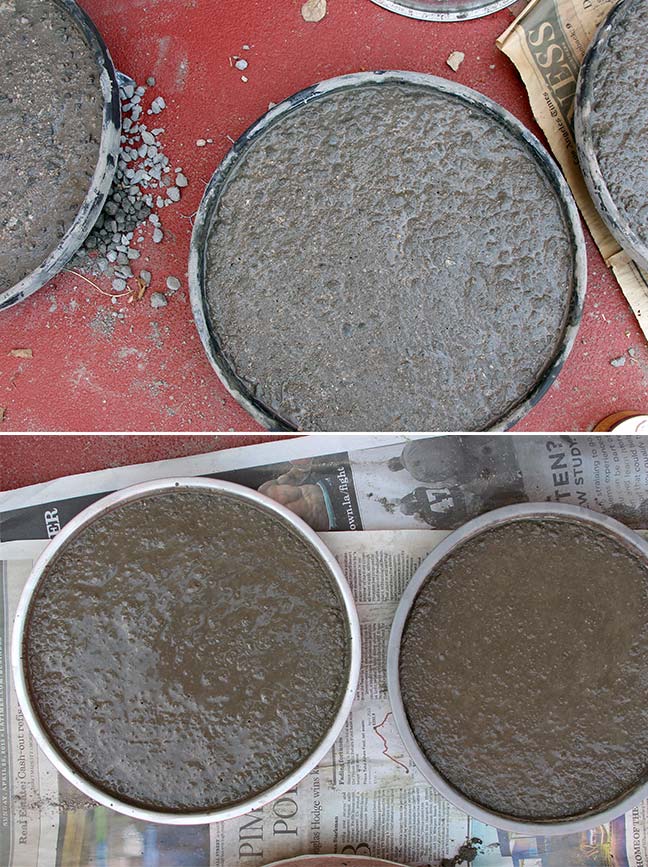
Tip one, learned the hard way: sift some of the larger rocks out of your Quikrete. That will help make it smoother. After that, mix the concrete as directed. It’s easy. We did mostly a 6-1 concrete-water mix, but adjusted as needed until the consistency was like thick brownie batter. WEAR GLOVES AND A MASK WHILE YOU DO ANY OF THIS. Concrete is no joke on your lungs and skin.
(Tip two: Spray a bit of Pam cooking type spray in your mold first, and the stones will be easier to get out)
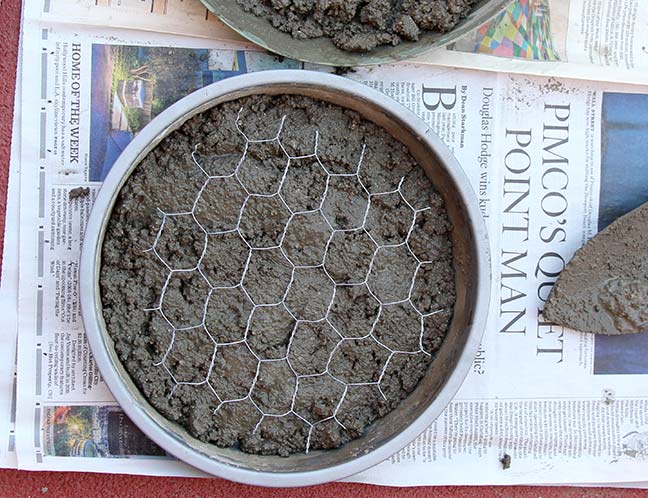
Pour a little concrete into a stepping stone sized mold, but don’t fill it up yet. Our molds were the base of a planter (from Home Depot) and some cheap cake pans. Once it’s halfway full, STOP, put in a piece of chicken wire cut into a circle. This adds strength to the stone, or so we’re told. Once that’s in, add more concrete to cover the wire. Lightly shake the mold a little to get the concrete to settle.
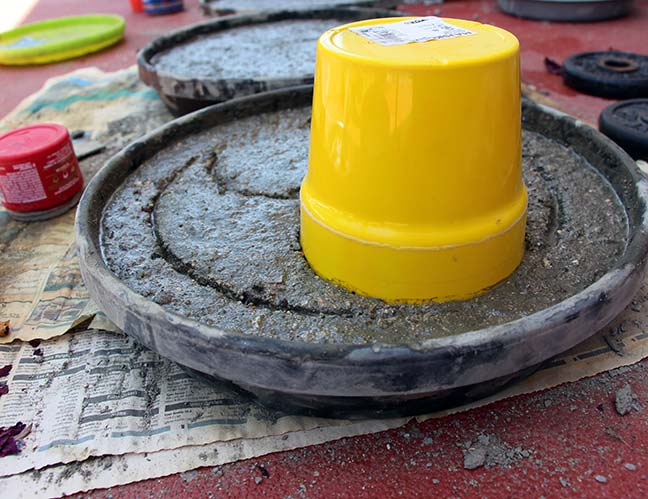
While the concrete sets for a few minutes (meaning 1-2 hours), gather up a bunch of round stuff to make your Gallifreyen patterns. Cups, bowls, empty cans, small planters/pots, lids, etc. By now you should already know what you want to write in Gallifreyan. We used a free Android Gallifreyan app (which is a thing – there are also other translators online), and wrote our names, then Our, Nerd, Home, and Geek.
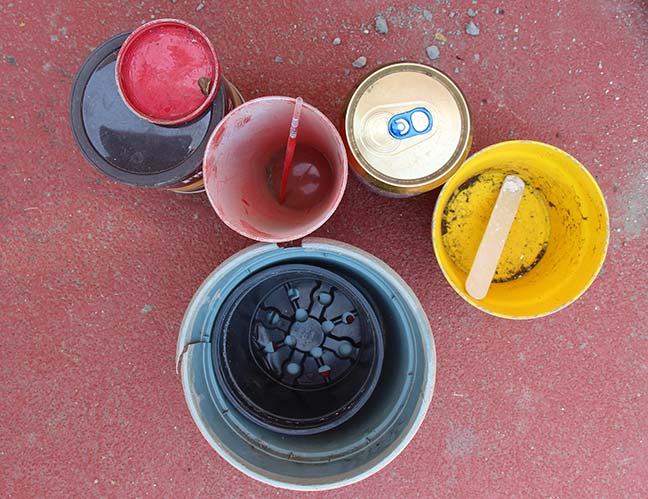
Random round things
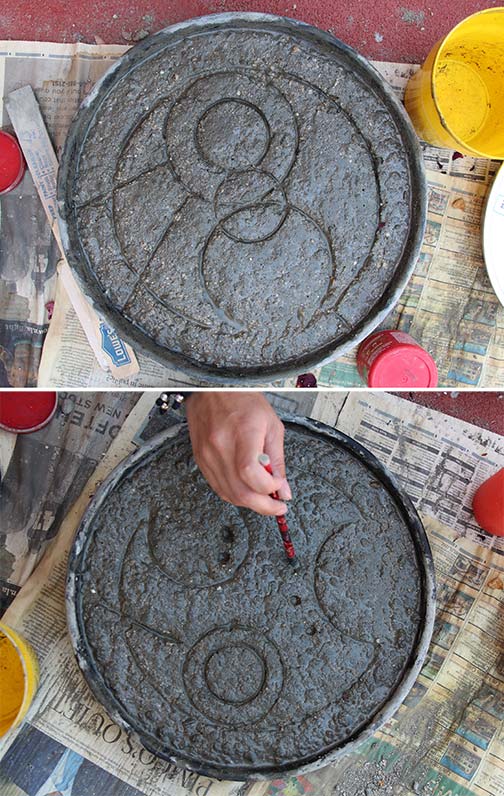
When the concrete is still wet, but juuuust starting to dry, that’s when you want to start stamping in your Gallifreyan patterns. If you do it too soon, the pattern drowns and fades away – if you wait too long, it gets rocky and weird. This took some experimenting to figure out.
We started with the largest circle, which for us was a small planter base. Lightly press the circle in, wiggle it around a little, and slowly lift it out. See?
Move right onto stamping the next circles in the pattern. Some patterns needed to have parts of the circle “erased”, so we just ran a wet, gloved finger over the concrete to smooth out specific areas. You can see in the background of this photo that we smoothed over an area.
For patterns that needed small dots, we used a pencil eraser. For patterns that needed straight lines, we used a paint stick and popsicle stick.
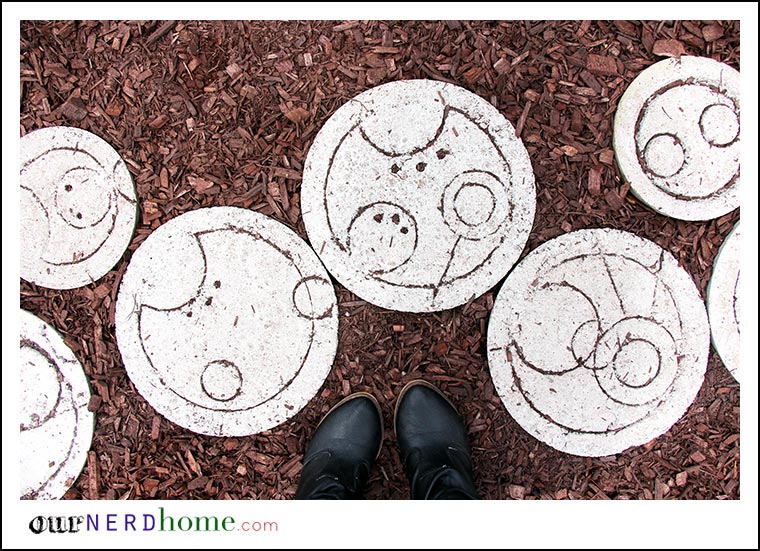
That’s it! Leave them alone to dry for a couple of days, then carefully turn the pans upside down to release the stepping stones. Once you get them in the ground, dirt will naturally add a nice extra emphasis to the pattern. 🙂
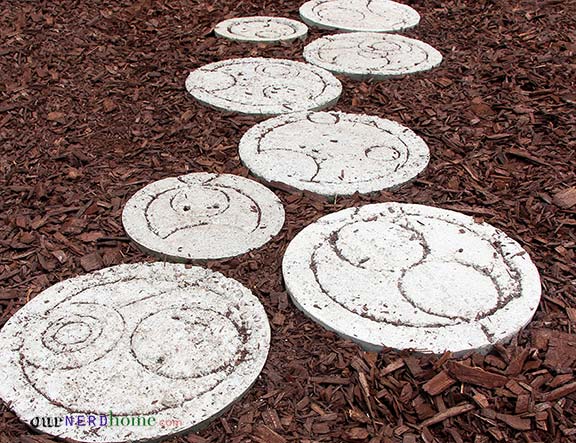
We recently had to let most of our grass die (LA drought), so are converting most of our yard to mulch and gravel. We’re thinking the new Doctor Who stepping stones walkway gives some much needed interest to the yard – plus we like that our non-geek friends will just think it’s a unique pattern, and not even know/care that it’s Gallifreyan. 🙂
What do you think? Anyone else geeking out their yard this summer?
 Jennie Lee says
May 14, 2015 at 8:46 amI made over 30 Celtic knotwork stepping stones using a mold that I bought on eBay. They turned out great, and were fun to make. I didn’t use the chicken wire, and had no problem with durability. I don’t know how easily yours are coming out of the mold, but I rubbed motor oil all over the inside of the mold before pouring in the cement. Also, I used an old Tupperware bowl to mix cement in, and after determing exactly how much Quikrete and how much water to use, I marked a line on the bowl, to show how much Quikrete is needed, and measured the water w/ a measuring cup. Another neat thing you can do, if you’re using a mold with the design in the bottom, is to put half the cement in, and put some kind of hook in the cement on the surface. This makes a nice “plaque” you can hang up. Thanks for your cool blog!
 ournerdhome says
May 18, 2015 at 11:12 amCeltic knotwork stepping stones sound gorgeous! Great tip with the tupperware bowl too. 😀
 Jennie Lee says
May 14, 2015 at 8:56 amI thought I should mention this. At least, this is one place I can suggest this without people thinking I’m nuts! They make beautiful beach towels these days. The printing is colorful, and photorealistic. They’re basically cloth POSTERS. I have my eye on a really nice Avengers one currently for sale at Walmart. I’d like to hang in up using binder clips, in my “Comic Book Room”. You could easily change to a different one, later. You could put them in a place where a paper poster would get torn up. They’re washable! Whataya think?
 Beth says
May 14, 2015 at 5:15 pmYou could stretch the ends over some wood and make a “canvas”! Super cute 🙂
 ournerdhome says
May 18, 2015 at 11:13 amOoh, I like the idea of those both for artwork, and for just having more geeky beach towels! 😉
 acbshada says
May 14, 2015 at 10:48 amI love these so much that I might just fall on the ground in a squee-coma right now…
 ournerdhome says
May 18, 2015 at 11:13 amHaha, thank you!! 🙂 🙂
 ejensen says
May 14, 2015 at 10:57 amBrilliant! In my best David Tennant imitation voice. 🙂
 ournerdhome says
May 18, 2015 at 11:14 amThank you! And anytime anyone ever says “Brilliant”, we hear David Tennant’s voice. 😉
 aquabonesSarah says
May 14, 2015 at 2:44 pmThese are seriously so, so lovely and so creative! Aaaah, I’m going to have to make some for myself! Thanks for sharing your methods 🙂
http://www.demosthynes.com/
 ournerdhome says
May 18, 2015 at 11:15 amThank you! And you should definitely make some! Once we got the hang of it, they were so easy. 🙂
 kaycreate says
May 14, 2015 at 3:57 pmThese are fantastic.
 ournerdhome says
May 18, 2015 at 11:15 amThank you!! 🙂
 Beth says
May 14, 2015 at 5:13 pmThese are great and when my daughter and her fiancé get a yard, I think I’ll bring over the supplies for a play date. Once again I’ll prove to be the coolest future MIL in town! Thanks!
 ournerdhome says
May 18, 2015 at 11:16 amGreat idea! Everyone can write their names on a stone! We might have to make another batch, with friends over. 🙂
 Casey Smith says
May 15, 2015 at 7:48 amTry RapidSet. Very smooth and easy to work with. You would have had a much easier time
 ournerdhome says
May 18, 2015 at 11:18 amWe actually did a couple of trials with RapidSet (same time we tried the Portland cement/sand mix). Definitely smoother, but in the end we liked the slightly rocky look of the sifted Quikrete a little better for our yard, since we wanted a more “natural” (as natural as Doctor Who step stones could look 😉 ) feel. Great tip for people who want the stones extra smooth though! Thank you.
 Kendall Ashley says
May 15, 2015 at 7:56 amThese are so rad. I can’t wait to try this out. I just need a yard, and I’m all set…
 ournerdhome says
May 18, 2015 at 11:20 amThank you!! You could always paint a version on cut-out carpet circles, and have a “stone path” in your house. 😉
 Gretchen@BoxyColonial says
May 15, 2015 at 10:17 amFabulous! Grass is overrated anyway. It’s definitely not as good as Doctor Who stepping stones.
 ournerdhome says
May 18, 2015 at 11:22 amThank you! Letting most of our grass die was a little sad, but we’re finally getting used to the idea of “desert landscaping” (this drought is awful!).
 Lisa says
May 15, 2015 at 10:56 pmThey are fantastic! The last project I did with cement was a failure because of the big rocks in it; next time I will sift it like you did ^___^
 ournerdhome says
May 18, 2015 at 11:23 amOur first attempts at this were pretty big failures too, haha. Sifting definitely makes a big difference! We mainly just pulled out the big rocks, and kept all of the small/medium ones in there, to give some texture. 😀
 thymelord says
May 20, 2015 at 5:00 pmwe are closing on our first house the end of June, and will be doing this. we are all Whovians from way back. I am also making stone and pebble pathways, and these will fit right in. Awesome tutorial Thanks for posting it.
and my xbox name is The Thymelord. so this is extra perfect.
 ournerdhome says
June 7, 2015 at 3:19 pmThat is one of the best xbox names I’ve ever heard!
 Celeste says
May 21, 2015 at 2:05 pmIf I had a yard, I would fill it with these stepping stones. -thumbs up-
 Nikki @ Tikkido says
July 3, 2015 at 2:26 pmAwesome! If only I’d seen this before my daughter’s Doctor Who birthday party! (http://tikkido.com/blog/Doctor-Who-Birthday-Decor) The stepping stones would have been an awesome addition to our yard. Still can be, of course, but how perfect would those have been at the party?
 ournerdhome says
July 5, 2015 at 2:43 pmYour party decor looks AMAZING!!!
 Christy says
September 22, 2015 at 5:21 pmGlow in the dark powder added on top or paint would be awesome
 ournerdhome says
September 23, 2015 at 8:26 pmOoh – that’s a great idea!! 🙂
 Douglas Wise says
March 8, 2016 at 9:12 amI made hexagonal patio tiles a few years back trying to make the yard a bit like an area in a Myst game. Six bricks coated in Pam for the side. I’ll keep these in mind, and the chicken wire addition. If you try again, look at concrete dyes.
 Lynne Allison says
April 26, 2016 at 3:37 pmHere it is, almost a year later. How are the stones holding up? I’m creating a Gothic-nerdy garden area this spring and summer, and was delighted to find this stepping stone tutorial! I wonder if I can dye them Tardis blue?
 ournerdhome says
May 3, 2016 at 12:18 pmThey’re still holding up really well! They’ve gotten more dirty/weathered, but that seems to look better (it made the lettering/symbols look more worn-in). We’ve never worked with concrete dye, but Tardis blue stones sound awesome!